Thursday, January 31, 2019

Xerox ColorQube 8570 / 8870 "Waste Tray Missing" Error - Solved!

After so many years of faithful service, my Xerox 8570 started to show symptoms of its age. A frequent complaint about missing ink sticks, routine paper jams, occasional freezing. The most frustrating of all was the error I encountered a few days ago.


It happened after I checked and emptied the waste tray. Suddenly the printer complained the waste tray was missing when it was clearly inserted all the way into the tray slot. After a few printer reboots and reseating the tray, I realized it was not a glitch in the software or dust gathered somewhere blocking the sensor.

I got curious how the printer firmly believed the tray was missing, so I checked the tray to notice a protruding area that looked like a docking portion to something. If it was, there should be a sensor far inside the slot. I used my phone as a flashlight to peek in the slot and noticed something black dangling on a wire. Apparently, it was a sensor knocked out of its place.


I tried a few different approaches to replace the sensor to its place without success as,

1. I didn't have any reference to move it to its intended location.
2. I needed a long tong or tweezer to finish the operation successfully.

After reading some online posts from people who tried to correct the issue themselves(and failed), I decided it was not a sound decision to disassemble the whole printer to reach the sensor block and reseat it.

Instead, I looked up the Xerox 8570 service manual to locate where the sensor wire leads to. According to the manual, the waste tray sensor was connected to P/J102 on the I/O board(see page 7-6 on the manual).


The I/O board itself is located on the top left corner of the printer when you see the printer from the side where the access door to the waste tray/maintenance kit is. In order to reach the I/O board, the right side cover needs to be removed. Following instruction on page 4-6 and 4-7 of the manual, I easily removed the right side cover to reveal the I/O board:


On the top left corner of the I/O board, I located the P/J102 jumper with 3 wires in blue, red, and black color. Apparently, these wires needed to be connected in some combination to make the printer to believe everything's okay down there in the waste tray slot.

First, I removed the three wire socket from the jumper.


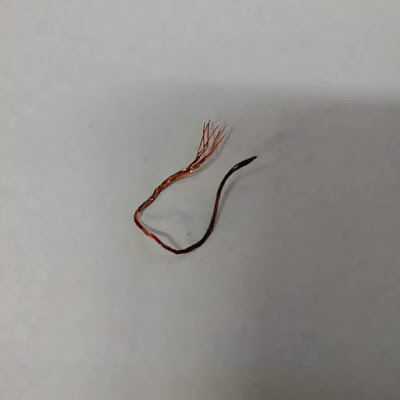
In order to test different combinations of wire connection, I stripped a short copper wire(I had to burn out the coating, to tell you the truth). I bent the prepared wire to make it easier to touch each pin on the jumper to try simulating different combinations of wire connection.


After a few trials, I found out the right combination was to connect ALL THREE pins together. Connecting the three pins stopped the error message for missing waste tray, and the printer prompted to close the exit door. Voila!


I put the wire between the pins in the way shown below so that it contacted three pins and stayed there.


Then, I plugged the three pin socket back to secure the wire (be careful so the copper wire doesn't touch any other components on the I/O board. That is why I bent the wire away from the I/O board as a precaution).


After restoring the covers and doors, my Xerox 8570 was finally back to normal! (Sans some ink sticks :) )


I am so glad I could solve this issue without much effort and hope this instruction helps people with the same issue. :)

Disclaimer: As usual, please note if you follow this instruction, you are doing it at your own risk. If you forget to put back the waste tray in, you will end up with a mess. Leave the waste tray in the slot at all times except to empty the waste once in a while, Okie? :)

Also, if you are looking for REAL saving on your car insurance, check this out. They only charge you for the mile you drive!


Wednesday, June 18, 2014

Xerox ColorQube 8570 - How to Use Metered Ink Sticks on Unmetered Printer

I love Xerox ColorQube 8570. One problem is that the cost for ink sticks are kind of high, although they are less costlier than that of inkjet printer cartridges. I had been buying ink sticks on eBay for quite some time, but it's difficult to find bargain-priced ink sticks all the time. There are generics and even re-manufactured ones available, but due to the past bad experience with those(I had used Xerox Phaser 8200, 8400, and 8500 in the past, used quite a number of generics and genuine), I had made a decision not to use them on my ColorQube 8570 at purchase time.


One day, I found a very good looking deal on eBay for a pack of black ink sticks for ColorQube 8570 at a much lower price than I thought was possible. Thinking it was a closeout deal or something, I chose to 'buy it now' without a second thought. Only after receiving the ink sticks I noticed the description on the item description section that the ink sticks were intended for 'metered' printers. I also found out the bottom of ink sticks are coded in a way to prevent metered ink sticks from used on unmetered printers and vice versa.


For those who do not have a clue, 'metered' printers are exact same Xerox ColorQube printers with different pricing (much higher printer price with much lower supply cost). Xerox apparently decided to use two different pricing structure for general consumers and business customers as their needs are different.

Anyway, since it was apparent I couldn't use the ink sticks as the printer didn't welcome them with a positive message nor let me slide them down the ink stick lane, I had to find a way to get around it. The eBay page I had bought them from also had a note that I couldn't return them. Yes, all sale was final.

The first method I thought of was using heat to cut out the coded part on the bottom to make the code match that of unmetered ink sticks. This generally was a hit or miss as the sensor in the ink stick cabin wouldn't let the ink stick to pass the inspection slot most of the time, depend on the detail of the work I had done to the ink sticks. This also involved heating up a knife using a lighter, cutting out a chunk of ink stick, and detailing which would create a mess on the knife and my hands.

Frustrated, I began to think of a better way to circumvent the detection mechanism, observing how the printer detects ink sticks. After some time, I noticed I could use a really simple method to let the metered ink sticks go down the lane. The things you need? A set of unused, unmetered ink sticks and a moderate length stick(or anything that is thin and sturdy enough to hold down something).


Here's how:

1. Take note of the location of the gate that blocks the ink stick.

2. Place an unmetered ink stick in one of the drop holes, but hold the top with your fingers so that it doesn't slide down after the sensor check. 

3. When you hear the 'click' that opens the gate that blocks ink sticks, use a stick to hold the gate down.

4. Remove the unmetered ink stick and drop in the same colored metered ink stick in the drop hole.

5. This can be a little tricky, but you can do it if you are any person older than 2 years of age - put a finger on top of the ink stick and move it down the lane while keeping the gate down as long as possible.

6. The ink stick will pass over the gate and go down the lane. You will have to remove the stick that holds the gate down at some point after part of the ink stick passes over the gate.

7. Now close the ink compartment door. The printer will work as normal.

My only concern is that I do not have definite information on melting temperature differences between the two ink stick groups if any. Fortunately, however, I have not had any issue due to this procedure so far and enjoying the new option in buying Xerox ColorQube ink sticks. :)

Legal stuff (Yup. Need to put this here in case :) ) : If you do try this method, please note you are doing it at your own risk.

Also, if you are looking for REAL saving on your car insurance, check this out. They only charge you for the mile you drive!